Mastering the Julia REPL
Acquire knowledge on Julia REPL basics and increase your output with practical guidance.
Julia is a relatively new, free, and open-source programming language. It has a syntax similar to that of other popular programming languages such as MATLAB® and Python, but it boasts being able to achieve C-like speeds.
Similarly to other dynamic languages, Julia provides a REPL (read-eval-print loop) for interactive development.
Here are some reasons why the Julia REPL is a useful tool:
- It speeds up prototyping because not all your code needs to compile each time you tweak a function.
- It enables interactively working with and inspecting Julia objects (for example, to see what data is stored, or to discover object fields).
- It provides different prompt modes, enabling interactive access to documentation and providing a clean interface for package management.
In this post, we will learn how to use the Julia REPL, including the different prompt modes and some useful keybindings.
This post assumes you already have Julia installed. If you haven’t yet, check out our earlier post on how to install Julia.
Starting the Julia REPL
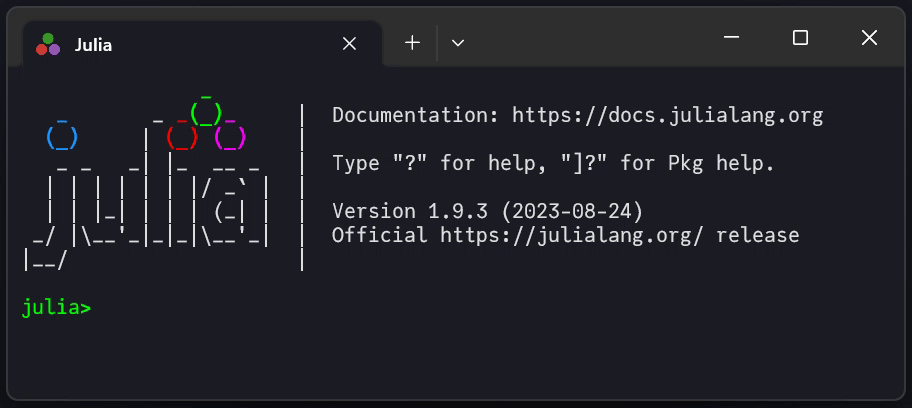
The Julia REPL starts immediately
when the Julia executable runs,
either by double-clicking the executable
or by calling julia from the terminal
(with no arguments).
$ julia
               _
   _       _ _(_)_     |  Documentation: https://docs.julialang.org
  (_)     | (_) (_)    |
   _ _   _| |_  __ _   |  Type "?" for help, "]?" for Pkg help.
  | | | | | | |/ _` |  |
  | | |_| | | | (_| |  |  Version 1.X.X (20XX-XX-XX)
 _/ |\__'_|_|_|\__'_|  |  Official https://julialang.org/ release
|__/                   |

julia>
Once the REPL starts, you will be at the Julia prompt.
REPL Prompt Modes
The Julia REPL can operate in different prompt modes:
- Julia mode (the default),
- help mode,
- Pkg mode, and
- shell mode.
To enter help, Pkg, or shell mode,
place the cursor
at the beginning of the Julia mode prompt
and
type a question mark (?),
a closing bracket (]),
or a semicolon (;),
respectively.
To return to Julia mode,
place the cursor
at the beginning of the prompt
and press Backspace.
Julia Mode
The default prompt mode is the Julia prompt, where Julia code can be evaluated. We can type any valid Julia code and press Enter, and then the code will be evaluated and the result displayed.
julia> 1 + 1
2
We can also type invalid Julia code, and the REPL will tell us what went wrong.
julia> 1 + 1)
ERROR: ParseError:
# Error @ REPL[1]:1:6
1 + 1)
#    ╙ ── extra tokens after end of expression
Stacktrace:
 [1] top-level scope
   @ none:1
We can assign variables and define functions to use in subsequent expressions.
julia> a = "hello"
"hello"

julia> function say(x)
           "say " * x
       end
say (generic function with 1 method)

julia> say(a)
"say hello"
Note that the most recently evaluated statement
is stored in a variable called ans.
julia> ans
"say hello"
If desired,
we can suppress output
with a semicolon ;.
julia> "no output";
Note, however,
that a semicolon does not suppress
the output of commands like print.
julia> print("this still prints");
this still prints
Including Code from a File
We can also evaluate code
stored in a file.
For example,
suppose we have a file, code.jl,
with the following contents:
# code.jl

function plus1(x)
    return x + 1
end

a = 3
b = plus1(a)
We can run this code in the REPL
with the include function:
julia> include("code.jl")
4
Note that 4 is the result
of the last evaluated line
of the file,
so that is what is displayed
at the REPL.
Now that code.jl has been included,
we can use what was defined
in the file.
julia> c = a + b
7

julia plus1(c)
8
Numbered Prompt
As noted earlier,
ans stores the value
of the most recently evaluated statement.
This means that ans is overwritten
every time code is evaluated.
Sometimes, however,
it can be useful to store
more than just the most recent result.
Julia provides a numbered prompt
for this purpose.
It can be activated as follows:
julia> using REPL

julia> REPL.numbered_prompt!()
Then the prompt will change
from julia> to In [x]:,
and results that would have been written to ans
will now be written to Out[x].
In [3]: 2^7
128

In [4]: Out[3]
128
Help Mode
Help mode is useful if, as the name suggests, you need help. Help mode displays the documentation (if available) for what is typed in the prompt.
With your cursor at the beginning
of the Julia prompt,
type ? to enter help mode.
Doing so will change the prompt
from julia> to help?>.
From there,
just type what you want help with.
We can pull up the documentation for a function:
help?> print
search: print println printstyled sprint isprint prevind parentindices

  print([io::IO], xs...)


  Write to io (or to the default output stream stdout if io is not given)
  a canonical (un-decorated) text representation.
  ⋮
We can find help for a variable we have defined:
julia> a = 4;

help?> a
search: a any all abs ans Any axes atan asin asec any! all! acsc acot acos

  No documentation found.

  a is of type Int64.
  ⋮
We can also figure out how to type unicode characters:
help?> ≡
"≡" can be typed by \equiv<tab>
(Just copy-paste the unicode character you want help typing.)
Pkg Mode
Pkg mode provides a convenient interface for package management.
With your cursor at the beginning
of the Julia prompt,
type ] to enter Pkg mode.
Doing so will change the prompt
from julia> to (environment) pkg>.
Here,
environment refers to
the currently active package environment,
which by default is @v1.X
(where 1.X is the Julia version currently running).
(A package environment is essentially the set of packages currently available to use. We will talk more about package environments in a future post.)
Once in Pkg mode, we can (among other things)
- list the currently available packages:
pkg> st - add packages:
pkg> add Plots - remove packages:
pkg> rm Plots - and update packages:
pkg> up
We can also ask for help:
pkg> ?
  Welcome to the Pkg REPL-mode. To return to the julia> prompt, either press
  backspace when the input line is empty or press Ctrl+C.
  ⋮

pkg> ? st
  [st|status] [-d|--diff] [-o|--outdated] [pkgs...]
  [st|status] [-d|--diff] [-o|--outdated] [-p|--project] [pkgs...]
  [st|status] [-d|--diff] [-o|--outdated] [-m|--manifest] [pkgs...]
  [st|status] [-d|--diff] [-e|--extensions] [-p|--project] [pkgs...]
  [st|status] [-d|--diff] [-e|--extensions] [-m|--manifest] [pkgs...]
  [st|status] [-c|--compat] [pkgs...]


  Show the status of the current environment.
  ⋮
Visit the full Pkg documentation for more details.
Shell Mode
Shell mode enables quick access to the system shell.
With your cursor at the beginning
of the Julia prompt,
type ; to enter help mode.
Doing so will change the prompt
from julia> to shell>.
Once in shell mode, we can type system commands. For example:
shell> echo shell mode
shell mode
Note that on Windows, windows shell commands are not exposed. However, PowerShell or the command prompt can respectively be accessed via
shell> powershell
or
shell> cmd
Useful Keybindings
There are several useful keybindings, or keyboard shortcuts, that help improve and streamline work at the REPL.
Accessing Previous Commands
When working at the REPL, it is often the case where previous commands need to be repeated, possibly with some modification. There are two keybindings for accessing previous REPL commands.
- Up (i.e., the up arrow key):
Press Up
to cycle through previous commands
in reverse chronological order.
If there is text before the cursor,
only commands that match
up to the cursor
will be found.
For example,
pressing Up on a blank REPL line
will bring up the previous command,
while pressing Up
after typing
inwill bring up the previous command that starts within(e.g.,include("code.jl"), but not1 + 1). - ctrl-r and ctrl-s: Press Control and the r key simultaneously to enable reverse search mode, and then type part of the command to find. The most recent command that matches the search query will be found. Press ctrl-r again to find the next most recent, matching command, and so on. If you accidentally skip the command you were looking for, press ctrl-s to search in the opposite direction (forward search mode). Press Enter to select the command found, or press ctrl-c to exit search mode.
Tab Completion
Tab completion is another useful feature of the Julia REPL. After typing the first character(s) of a word, press Tab to complete the word if there is an existing Julia object that matches what was typed. For example:
julia> my_very_long_variable = 1;

julia> my<tab>
julia> my_very_long_variable
If there are multiple matches, Tab will complete up to the ambiguity. Press Tab again to display the matches.
julia> prin<tab>
julia> print<tab>

print        println      printstyled
Dictionary keys and object fields can also be discovered with tab completion.
julia> d = Dict("key1" => 1, "key2" => 2, "another_key" => 3);

julia> d["k<tab>
julia> d["key<tab>

"key1"  "key2"
julia> t = (foo = 1, foobar = 2);

julia> t.f<tab>
julia> t.foo<tab>

foo     foobar
Finally, tab completion can also display available function methods.
julia> split(<tab>
split(str::T, splitter; limit, keepempty) where T<:AbstractString @ Base strings/util.jl:601
split(str::AbstractString; limit, keepempty) @ Base strings/util.jl:608
Splitting a Command into Multiple Lines (alt-Enter)
Normally, when typing at the REPL, pressing Enter will evaluate the typed expression (if it is a complete expression). Sometimes, however, we just want to insert a new line. Pressing alt-Enter (or alt-Shift-Enter on Windows) will do just that.
Using a Text Editor (alt-e)
Instead of typing commands
at the REPL directly,
we can type commands
in a text editor of our choice
(e.g., specified by the EDITOR
environment variable on Linux)
by pressing alt-e.
After saving and exiting the text editor,
the contents will be pasted
into the REPL.
Halting Execution (ctrl-c)
If we want to stop a command, we can press ctrl-c to send an interrupt signal and return to the Julia prompt.
julia> sleep(100)
^CERROR: InterruptException:
⋮

julia>
Note that ctrl-c displays as ^C
in the REPL.
Pressing ctrl-c can also be an effective way to get an empty prompt (even if no code is running).
julia> I've typed a lot and don't feel like pressing Backspace^C

julia>
Terminating the REPL (ctrl-d)
Finally, pressing ctrl-d is a quick way to terminate the REPL.
Summary
In this post, we learned about the Julia REPL, including the different prompt modes and some useful keybindings.
How has your experience been with the Julia REPL? Let us know in the comments below!
Comfortable with the Julia REPL? Move on to the next post to learn about vectorizing, or broadcasting, functions! Or, feel free to take a look at our other Julia tutorial posts!
Additional Links
- Julia REPL Documentation
- Additional information about the REPL.
- Installing Julia and VS Code – A Comprehensive Guide
- How-to guide for installing Julia and VS Code.
MATLAB is a registered trademark of The MathWorks, Inc.